User:Hexanna
I started learning Hex mid-July of 2021, about 2 weeks before I created my LittleGolem account.
Contents
katahex/general strategy part 2 (rough draft)
This is not very organized, and some bullet points won't make sense without further context. I also need to decide which ideas are worth keeping. (I have outlines and rough drafts of even more stuff, but I'm worried about making the article too long and diluting it with only rarely-applicable advice.)
- Don't worry about switchbacks, climbing, or ladder creation templates on 15x15 or larger. They can be theoretically interesting and make for good puzzles, but games are rarely close enough for these to matter. Controversially, I personally don't think about them on any board size.
- Q: When should the defender of a ladder yield? A: Usually, don't yield unless your opponent can make an adjacent cut (defined below) through two of your stones, one above and one below the ladder. In that case, consider yielding.
- Example: https://hexworld.org/board/#13c1,c2e9c10d8b9c11d10d12 If Blue instead plays d11, Red e10 cuts through e9 and d11
- If you can't find a good move, avoid a bad one by playing "skew" relative to existing stones.
- That is, play a move that interacts with existing stones as little as possible (at least distance 3 from all other stones).
- The difference between a good move and a blunder is >5x the difference between a great move and a good move.
- Stone "arithmetic": not an exact science, use your intuition; play the move that maximizes the sum of local and global efficiency. I am not actually calculating values when playing, just making mental adjustments.
- The best move locally is rarely the best move globally. Hex is a game of concessions and tradeoffs. There is no "free lunch," unless you count concepts like inferiority/domination.
- Conversely, if it looks like your opponent is beating you on one side of the board, there are two possibilities:
- You played suboptimal moves in that region.
- Your opponent played too strong in that area, which necessarily means they made concessions elsewhere (usually the opposite side of the board).
- If the first option is true, you are probably losing anyways, so assume (or hope) the second is true. That means you should tend to tenuki and play the opposite side of the board, if you think your opponent overplayed one side. Indeed, if you continue playing on the same side, your opponent might be able to get out of their mistake by minimaxing, such that they go from being overconnected to being merely connected.
- For brevity, some notation for up-weighting and down-weighting particular moves:
- chess notation: ??/?/?!/!?/!
- one way to think about it: you are a machine who has to assign a score (or a prior policy probability) to each move. !? means slightly upweight, ! means upweight, ?? means strongly downweight, and so on.
- asymmetric scale, one blunder can take multiple "great" moves to recover from; also, brilliancies (!!) are rare and don't come from easily described rules like the ones in this article
- !? bridge moves, either from your own stone or your opponent's
- an additional !? if it's part of a bridge ladder that you'll win (you're playing 5-4 acute corner), ?! if your opponent will win
- ? moves adjacent to your own stone, unless you are minimaxing and know that it's the best move. Be careful of bad minimaxing, where you connect too weakly to one side, allowing your opponent to intrude for territory. More often than not, the concession you make here isn't worth the extra strength.
- Cuts (ignore the edges of the board, pretend it's 5 separate diagrams): https://hexworld.org/board/#19c1,e3f3f4e4i3:pk3j3n3p2q3o4e8:pg10f9m8:pn10o8
- Suggested names for brevity (from left to right, then top down): adjacent cut, near cut, short bridge cut (or just bridge cut), long bridge cut, skew cut
- ? allowing an adjacent cut
- ?? allowing a bridge cut, ! bridge cutting
- if Red allows a bridge cut, often the damage has already been done even if Blue doesn't actually cut through
- however, if Blue has to make concessions to cut through, like playing on her second or third row, that often neutralizes the ?? almost entirely - this is especially true if Blue already has an existing stone close to her edge (like a swapped c2 opening).
- Small patterns/motifs: https://hexworld.org/board/#19c1,f4f5e5:pk4j6i5:po4n7f12f15n11l15
- "In a vacuum" means "with no nearby stones"
- P1 (top-left): It's a mistake for Blue to play adjacent to the Blue stone in a vacuum. Red's best response is usually playing adjacent to both stones.
- P2 (top-middle): Blue plays a bridge away from Red's stone. This is often a good move, and Red's response a bridge away from both stones is also good.
- P3 (top-right): Blue plays a classic block. This is often fine for Blue, and Red doesn't have an obvious best local response. Red could tenuki here.
- P4 (bottom-left): The main intuition to learn is that Red e14 (a bridge away) is ? on the chess notation scale.
- P5 (bottom-right): Blue plays two bridge moves away. Again, Red m13 a bridge away is ? on the scale.
- If you study KataHex play, you can pick up by intuition what moves to play in 50-75% of situations. The hard part is figuring out what not to play in the other situations.
- Depth 1: Don't play moves that allow your opponent to cut through. (Also, already mentioned in Strategic advice from KataHex, "Don't play a move that makes your opponent's existing stones unnecessarily well-placed relative to your new stone.")
- Depth 2: Don't play moves where an otherwise natural continuation for you is to play a move pruned by depth 1.
- Use the patterns and intuitions that you know, to reason and make inferences in unfamiliar positions. You might not always find the best move, but you can often prune bad moves. Here is an extended example, involving several closely related patterns that are useful to know in isolation.
- Pattern: If you play the 4-4 3-3 obtuse corner joseki, it is important to know that Blue 6 here is weak: https://hexworld.org/board/#19nc1,d16c17d17c18d18e14c15
- This is because Red 7 undermines Blue 6 and also reduces Blue 2/4 from a 3rd row ladder escape to a 2nd row escape. Also, Blue's potential intrusion at c16 doesn't gain her anything.
- Instead, a good local response for Blue is as follows: https://hexworld.org/board/#19nc1,d16c17d17c18d18d15. This gives Blue a 5th row ladder escape while blocking Red 1.
- On the other hand, if Blue only has a 2nd row escape and doesn't have the "potential energy" to get a 3rd row escape, you might guess that Blue 6 above becomes a good local move, because Red 7 loses one of its main strengths. Such a guess would be correct: https://hexworld.org/board/#19nc1,d16c17p15d17e16g16e17f18d18e14c15 Blue 10 is a strong move here. On the other hand, Blue 10 at d15 would be weak here, as it's quite wasteful, only converting a 2nd row escape into a 3rd row escape.
- Pattern: If Red tenukis on move 3, then Blue 4 is locally strong here: https://hexworld.org/board/#19nc1,d16e14:pf15. In particular, Blue 4 is much stronger than bridging directly towards Blue's own edge with g13, because the former is a strong blocking move that reduces the effectiveness of Red 1. This strength is in spite of Red's intrusion on move 5. (I first saw this move in https://www.littlegolem.net/jsp/game/game.jsp?gid=2090091&nmove=16 from https://www.littlegolem.net/jsp/forum/topic2.jsp?forum=50&topic=739.)
- This pattern is actually applicable in many situations and is an example of pattern P2 (top-middle) above. If Red started with the 5-5 obtuse corner, then the equivalent Blue 4 is also strong.
- Another simple example is Red 5 in https://hexworld.org/board/#19nc1,d16d15f14:pe13.
- Inference: Let us consider this position again: https://hexworld.org/board/#19nc1,d16c17d17c18d18:p. Suppose Blue tenukis on move 6. What is a good local response for Red on move 7? There is more than one right answer, but you just need to find one move that isn't a blunder.
- Hint: Use the two patterns above to come up with an answer.
- Hint: Consider that Blue has a 3rd row ladder escape, so Blue d15 is locally strong but Blue e14 is weak. This is the case for future blue stones in this local region, even though Blue already played elsewhere on move 6. Therefore, Red should perhaps try to play a move that makes Blue d15 less attractive, even if it comes at the concession of making Blue e14 more attractive (since the latter is a priori a weak move, such a concession gives up less than it otherwise might).
- Answer: Red 7 here is a good local move: https://hexworld.org/board/#19nc1,d16c17d17c18d18:pe13
- Why? Ignoring stones 2-5, the presence of Red 1 and 7 makes Blue e14 more attractive. Red's 4-4 stone, much like the obtuse corner opening, tends to shift Blue's efficient stone locations up one row. With that in mind, Red's move 7 is a bit like Red e14 on an empty board, where Blue e15 is the best response: https://hexworld.org/board/#19nc1,e14e15. However, stones 2-5 make Blue e14 a bad move, despite Red 7 making it slightly less bad (this is the concession-but-not-really-a-concession that Red intended).
- Let's now consider Blue d15. Normally a decent local move after stones 1-5, it becomes quite weak after Red 7, because of https://hexworld.org/board/#19nc1,d16c17d17c18d18:pe13d15f14. This is a typical example of the second pattern in this extended example. (Actually, if Blue had two moves in a row in this region, Blue 8 wouldn't be so bad because she could follow up with f14, where Red wants to play move 9. This is a tactical situation where it's bad for Red to tenuki.)
- If we wanted to be complete, Blue actually has another option for move 8, f14 first which threatens d15: https://hexworld.org/board/#19nc1,d16c17d17c18d18:pe13f14d15d14e14. This is an example of the "skew cut" from above. Red should respond with d15 himself, or else Blue can play d15. This is probably Blue's best local response.
- Every move makes a concession, but some concessions are more effective than others. As alluded to in the hint, Red 7 weakens a strong Blue reply (d15) while strengthening a weak Blue reply (e14). Red's goal is to minimize the strength of Blue's best response (rather than the strength of Blue's average response), and Red 7 at e13 accomplishes that beautifully.
- Part of getting stronger at Hex (as with other games) is being able to compress knowledge and patterns effectively. If you understand this extended example, you can infer the best move in many similar but novel situations, without memorizing each one individually. If you forget which move is exactly the best, you can recover the right move with high probability by just reasoning about related patterns that you do know are strong or weak.
- On larger boards and particularly near the opening or middlegame, when you have a lot of time to think about a position, it may be worth spending a good chunk of it making inferences and scoping out moves that are either good or to be avoided by each side, rather than spending most of your time calculating tons of lines and variations.
- The a3 escape trick example from Strategic advice from KataHex is another case of this concept.
- Pattern: If you play the 4-4 3-3 obtuse corner joseki, it is important to know that Blue 6 here is weak: https://hexworld.org/board/#19nc1,d16c17d17c18d18e14c15
Insights and tidbits from KataHex (hzy's bot)
- katahex_model_20220618.bin.gz (I'll call this the "strong" net) appears significantly stronger than the "default" net.
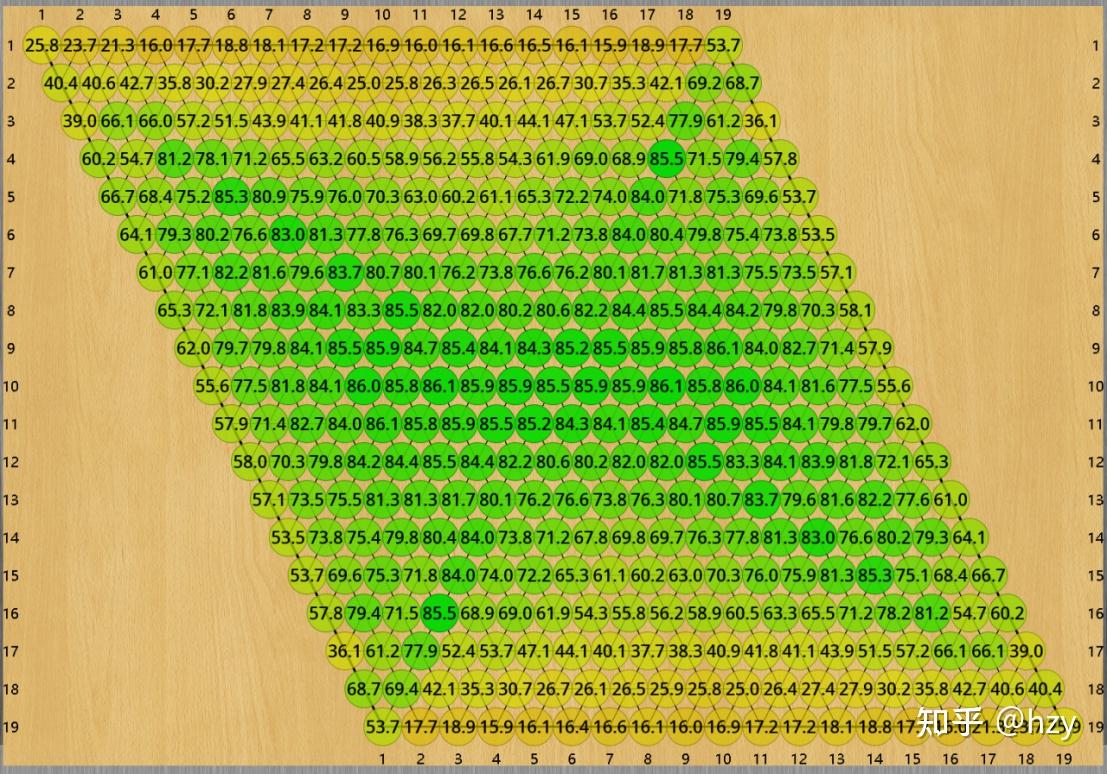
- Swap map for 19×19 generated with the strong net, with around 15k visits for most moves. For the red hexes, the number corresponds to Blue's Elo advantage if she swaps Red's move; for the blue hexes, the number corresponds to Blue's Elo advantage if she does not swap Red's move. Smaller numbers correspond to fairer openings. Includes all fair openings as well as a few selected unfair openings, including the strongest move without swap (e10). I used more visits for the fairest moves: 1000k for e3 (49.5% win rate), 500k for n3 (49.2%), 100k for a15 (52.5%).
- Key takeaways: The swap map at Swap rule#Size 19 uses data that is almost certainly from the "weak" net. Compared to the weak net, the strong net notably thinks a19, n3—p3, and k4—l4 are stronger. I personally trust the strong net's evaluations more; I think it's dubious that the weak net thought l4 was a very fair opening. The nets disagree on whether e3 is winning or losing, though it's so close to 50% that the difference isn't meaningful.
Random unsolved questions
Most of these are very difficult to answer, and I would be happy if even a few were answered in the next few years:
- Is the obtuse corner always winning on larger board sizes? What about the b4 opening? Let P(n) be the statement that "the obtuse corner is a winning opening in n×n Hex without swap." There are a few possible cases; an interesting exercise is to come up with subjective probabilities of each case being true.
- A. P(n) is always true. If so, can we prove this?
- B. P(n) is true for infinitely many n, with finitely many counterexamples. If so, what's the smallest counterexample?
- C. P(n) is true for infinitely many n, with infinitely many counterexamples. If so, does P(n) hold "almost always," "almost never," or somewhere in between?
- D. P(n) is true for finitely many n. If so, what's the largest such n?
- Kriegspiel Hex (Dark Hex), a variant with incomplete information
- Under optimal mixed strategies, what is Red's win probability on 4×4?
- For larger boards (say, 19×19), is Red's win probability close to 50%?
- If so, a swap rule might not be needed for Kriegspiel Hex, which would be neat.
- If not, imagine a variant where Red's first move is publicly announced to both players, and Blue has the option to swap it. Which initial moves are the fairest now?
replies by Demer:
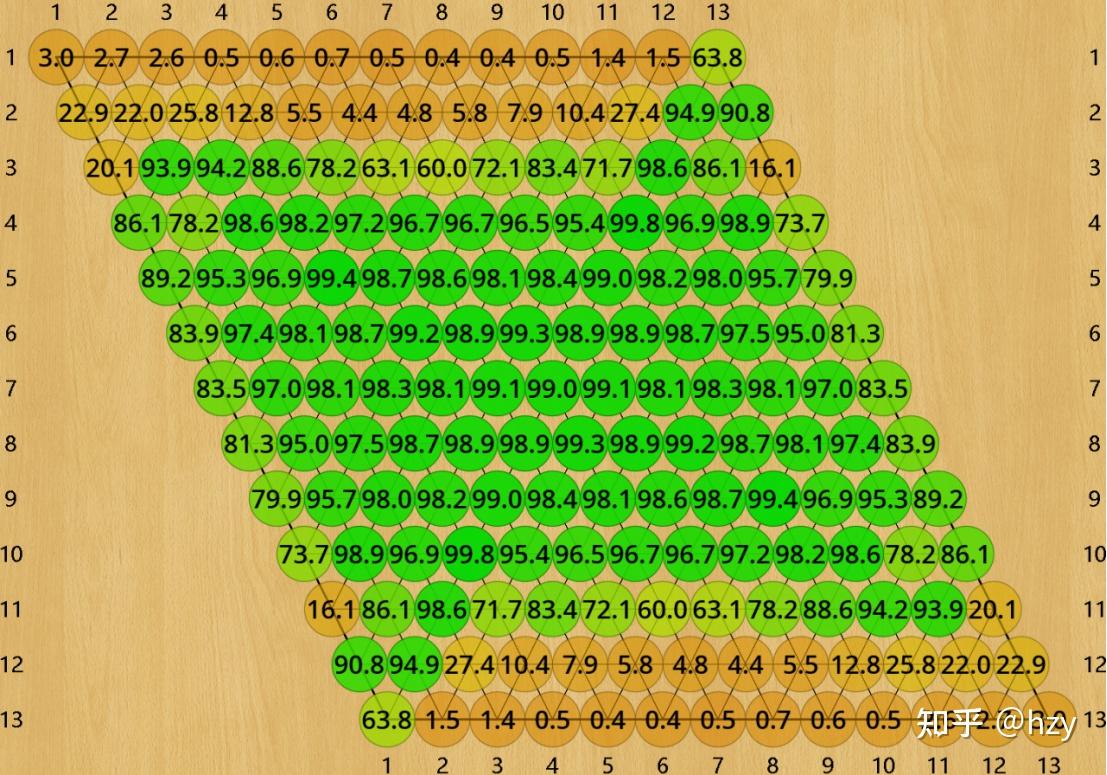
- https://zhuanlan.zhihu.com/p/476464087 has percentages, although it doesn't translate these into a guessed swap map and I don't know anything about the bot they came from.
- It suggests that [on 13x13, g3 is the most balanced opening] and [on 14x14, g3 should not be swapped].
- On 27x27 without swap, it likes the 4-4 obtuse corner opening slightly more than anything else nearby.
- As far as I'm aware, even 3×4 Dark Hex has not been solved. (https://content.iospress.com/articles/icga-journal/icg180057 apparently gives "some preliminary results" for that size.)
hexanna:
- Thank you, this is amazing! From the Google Translate, the bot is an adaptation of KataGo trained on 13×13 and smaller, using transfer learning to train larger nets on top of the 13×13 net for a short period of time. I may edit the swap rule article later with some insights.
- The results for up to 15×15 look very reliable to me. This is because many of the subtle patterns suggested by other bots, like leela_bot, appear in these swap maps. For example, on 13×13:
- a1–c1 are stronger than d1; a2–c2 ≥ d2 ≥ e2 in strength; and a similar relation holds for moves on the third row. See Openings on 11 x 11#d2.
- b4 is weaker than all of its neighbors, because Blue can fit the ziggurat in the corner.
- j3 is surprisingly weak and i3 is surprisingly strong. Many people were surprised about this when leela_bot's swap map came out, but the result may be more than just random noise.
- a10 is the weakest of a4–a10, while a5 is the strongest.
- b10 is stronger than all of its neighbors, because Blue cannot fit the ziggurat in the obtuse corner.
- That this bot picked up on all these subtleties, and assigns a win percentage close to 100% for most moves on 13×13, suggest to me that it is probably stronger than leela_bot and gzero_bot. I can't know for sure, though.
- On the other hand, and the author seems to agree, the 37×37 map looks very unreliable. I see percentages as low as 37% but only as high as 54% (for a move like f1, which should almost certainly be a losing move).
- The 27×27 map looks more reliable. I'm personally very skeptical that moves on Red's 6th row are among the most balanced moves, but there are some interesting (if somewhat noisy) insights to be had still.
- The results for up to 15×15 look very reliable to me. This is because many of the subtle patterns suggested by other bots, like leela_bot, appear in these swap maps. For example, on 13×13:
Recursive swap
Not really a serious suggestion, just for fun. One advantage of "recursive swap" over multi-stone swap is that opening preparation plays a smaller role, because both players have control over the first n stones.
RECURSIVE_SWAP'[k, depth, color]:
  if depth = 0:
    [color] continues playing as normal.
  else:
    [color] plays a move. [~color] can either
      swap[k], or
      RECURSIVE_SWAP'[k+1, depth-1, ~color]

RECURSIVE_SWAP[n]:
  RECURSIVE_SWAP'[1, n, Red]
RECURSIVE_SWAP[0]:
Red continues playing as normal.
RECURSIVE_SWAP[1]:
Red plays a move. Blue can either
- swap, or
- continue playing as normal.
RECURSIVE_SWAP[2]:
Red plays a move. Blue can either
- swap, or
- play a move, after which Red can either
- swap2, or
- continue playing as normal.
RECURSIVE_SWAP[3]:
Red plays a move. Blue can either
- swap, or
- play a move, after which Red can either
- swap2, or
- play a move, after which Blue can either
- swap3, or
- continue playing as normal.
Analysis
RECURSIVE_SWAP[0] is the same as playing with no swap.
RECURSIVE_SWAP[1] is the same as playing with the swap rule.
RECURSIVE_SWAP[2]:
- Red shouldn't play a move that's too strong or it'll be swapped.
- If Red plays a weak stone, Blue should try to play a move just strong enough that Red will be indifferent to swap2. (If a "fair" move is half a stone, and Red plays a weak move worth x < 0.5 stones, Blue should play a move worth x + 0.5 stones.)
- Red should try to play a weak move that's also hard for Blue to equalize (so that Red gets a sizable advantage when deciding whether to swap2 or not).
RECURSIVE_SWAP[3]:
- If Red plays a move worth x > 0.5 stones, Blue should swap.
- If Red plays a weak stone worth x < 0.5, Blue should play a move worth less than x + 0.5 (or else Red will swap2). If Blue's move is worth y, then Red should play a move as close to (y - x) + 0.5 as possible, so that Blue's swap3 decision is difficult.
- Red should play a weak move that's hard for Blue to find a tricky reply to (where a "tricky" reply is one that makes it hard for Red to equalize, such that Blue has an easy time deciding whether to swap3 or not).
Miscellaneous:
- Infinite recursive swap is (under perfect play) strategically equivalent to Reverse Hex, because each player must try to play a losing move as long as possible, or else their opponent will swap and win.
- On any board size, assuming the opponent has the swap option after the board is completely filled, I believe RECURSIVE_SWAP[n] is a win for Red if n is even, and a win for Blue if n is odd.
- I'm bad at proving things rigorously, but I think this follows from the fact that Reverse Hex is barely a win for the winning side (in that the losing side can delay the loss until the whole board is filled).
HexWorld bugs:
On 30x30, ad6 and ad11 are "dead" hexes that you can't click on. They don't show up even if you specify them in the url: here. All other hexes look fine.
On 31x31, the same clicking and url issue occurs for ad6, ad11, and ad31: here
- Interesting. It turns out that this bug is caused by an ad blocker, in my case Adblock Plus, although Comonoid reproduced it with AdGuard as well. The ad blocker doesn't like column 30 because its name is "ad". It adds the following CSS rules, among thousands of others:
 ad6 {display: none !important;}
 ad11 {display: none !important;}
 ad31 {display: none !important;}
- That's why those 3 cells are disabled, and no others! I will fix the bug soon.
- By the way, your HexWiki user page might not be the most efficient place to report a bug. Selinger (talk) 22:21, 20 April 2024 (UTC)
Fjan2ej57w's question 7, "how much space of an empty board would be filled if both sides play optimally":
Stack Overflow answer for reference. My conjecture is that Hex without swap asymptotically requires Θ(n^2) cells, and more generally, a Demer handicap of Θ(f(n)) stones requires Θ(n^2/f(n)) cells, for all f(n) between Θ(1) and Θ(n). My intuition is that on 1000000×1000000 Hex, the first-player advantage is minuscule, and even a handicap of n^(1/2) = 1000 stones, say spaced out evenly across the short diagonal, would require on the order of "1000 columns and 1000000 rows", n^(3/2), to convert to a final connection. Another interesting question is to find a constructive winning strategy with an o(n) (sub-linear) handicap.
reply by Demer: Even one with n/6 - ω(1) handicap would be interesting. (improving on https://webdocs.cs.ualberta.ca/~hayward/papers/handicap.pdf )