User:Hexanna
I started learning Hex mid-July of 2021, about 2 weeks before I created my LittleGolem account.
Hexata is a GUI and CLI for analyzing Hex that I vibe-coded. It's still under active development, but I already use it as my main GUI.
- One of the GUI's main advantages (and a primary reason I created it) is that it's fast and responsive. It's not as useful for "traditional" analysis as some other GUIs — it doesn't support adding comments to moves, for example.
- The CLI is primarily intended for AI coding tools and scripts. For example, I have used it extensively when developing the study tools below.
Hex Study Tools is a collection of interactive databases:
- Local pattern explorer with up to 6-stone local patterns
- Joseki explorer with acute and obtuse corner sequences
- Opening explorer with opening lines on sizes 11–14 and 17
- Of these tools, I put the most thought into the design of the local pattern explorer, and it's probably the most useful one for improving at Hex.
Contents
basic 1-2* hex strategy
Here is a sample game of Hex with 1-2* turn order.
A few things stand out compared to regular Hex:
- In regular Hex, a bridge connects two stones. In 1-2* Hex, two stones like this are connected:
- Red can play both A cells, both B cells, or C to connect. Blue cannot block all three threats in a two-stone turn.
- The corner created by moves 1 and 2 is interesting. Each player can connect at the corner but needs to spend two stones in order to do so. Any single move marked (*) allows the opponent to connect (with two stones).
- In regular Hex, the a2-b3-c4 diagonal is strong for Red. In 1-2* Hex, the a3-b4-c5 diagonal appears strong for Red. See 3. c5 or 23. k9, for example.
- Sometimes, the game partially collapses to single-turn Hex, where one side plays a move that would be an irrelevant but forcing move in regular Hex (like a time tesuji). A player with the initiative could use time tesujis to decide the tempo of play, choosing between one or two real moves per turn.
draft of more strategy stuff
There's a fair amount of stuff for Strategic advice from KataHex that I've either been too lazy to write up / polish, or haven't thought of a good way to explain. I also haven't properly conveyed which things are important; some things come up rarely and should either be mentioned briefly or cut for the article. There's also a tradeoff in generality/specificity and concreteness/abstractness.
- terminology: inaccuracy < mistake < blunder
- evals are noisy, taking the highest one in non-tactical situations can be biased
- much later, talk about strength on an edge and how it behaves with existing stones
Local patterns and how to think about them
[prerequisites: cuts, maybe "pattern 1" and other patterns in that section — consider reordering]
It's a good idea to first study patterns in a vacuum, meaning in the absence of nearby stones. This provides a useful baseline when evaluating a move — if you only study patterns in the context of real games or on smaller boards, it's difficult to tell whether a move was good because the resulting pattern was inherently good, or because the rest of the board worked in your favor. A few points worth mentioning first:
- We'll sometimes use quantitative language, such as "fractions" of a stone. That doesn't mean you need to memorize the numbers or do a bunch of math while playing Hex. Numbers are just less ambiguous than words.
- Hex strategy is largely about making the right tradeoffs and avoiding blunders, not finding "the best move." Real games are messy. There are local/global considerations and the possibility of overlapping patterns or regions. For each pattern, try to learn not only the "optimal" move(s), but also roughly how bad the suboptimal moves are, so you can properly weigh moves that look strong in one dimension but weak in another.
- You won't remember everything here, and this guide isn't exhaustive. Your goal is to build a parsimonious mental model of Hex: what good/bad Hex looks like, and why, so that your intuition generalizes well to new positions.
- One mental model we'll use: you can quantify how much a position/pattern/move favors one side in terms of fractions of a stone. The basic idea is that passing is like giving up "1 stone" (and so it's worth 0 stones), the best move is worth 1 stone, a fair swap move is worth 0.5 stones, and moves can also be worth >0.5 or <0.5 stones. The same idea can be extended to patterns. The crux of the mental model is that empirically, the superposition principle approximately applies, especially when multiple patterns are sufficiently far apart and independent. That is, if Red made a 0.2-stone mistake somewhere and Blue made a 0.1-stone mistake elsewhere, in some sense, your best guess is that Blue is ahead by 0.1 stones.
- This is a heuristic mental model — while I think it's very useful, it's not the ground truth. (Of course, every position is theoretically either winning or losing, but that's not a useful lens strategically.) In general, Hex is "nonlinear", and nearby patterns can absolutely interact. However, empirically it behaves well and is locally linear, which is usually what matters strategically. Of course, if you subscribe to this model, part of Hex strategy is also thinking about the nonlinearities.
- For the mathematically inclined: to evaluate a move or pattern, we consider KataHex win rates in logistic Elo space, and then we apply linear interpolation of the candidate move compared to the "optimal" and pass moves. (Technically, many KataHex versions don't work well with pass moves, so instead, we estimate the value of the worst move on an empty board — it's pretty close to zero — and use that instead.) Logistic Elo is the correct space to use because it's proportional to log odds, and adding Elo numbers is like multiplying odds, which is the correct way to apply updates in a Bayesian sense.
- One mental model we'll use: you can quantify how much a position/pattern/move favors one side in terms of fractions of a stone. The basic idea is that passing is like giving up "1 stone" (and so it's worth 0 stones), the best move is worth 1 stone, a fair swap move is worth 0.5 stones, and moves can also be worth >0.5 or <0.5 stones. The same idea can be extended to patterns. The crux of the mental model is that empirically, the superposition principle approximately applies, especially when multiple patterns are sufficiently far apart and independent. That is, if Red made a 0.2-stone mistake somewhere and Blue made a 0.1-stone mistake elsewhere, in some sense, your best guess is that Blue is ahead by 0.1 stones.
Local patterns can occur in "open" areas (areas far away from corners/edges, whether in a vacuum or not) as well as near corners/edges. Let's start with open patterns.
- The simplest open patterns are a single stone of your color, and a single stone of the opponent's color. They aren't as interesting as other patterns, but we'll discuss them for completeness.
- Given a stone S of your own color in a vacuum, where should you play relative to it? Suppose it's Red's turn in the below diagram.
-
- Most choices, like playing a bridge away from S at (b), a "classic block" away at (d), or further away at (e)/(g)/(h), are locally strong moves. One major exception is playing adjacent to S, like at (a), which is a mistake (intuitively, it's wasteful to play too many of your own stones close together). Playing two adjacent steps away at (c) or two bridge-moves away at (f) is an inaccuracy, because those moves are near and long bridge allow-cuts, respectively. We can use KataHex evals (applying some averaging and heuristic "noise reduction" methods) to quantify each move. For example, playing at (a) is a roughly 0.35-stone mistake in a vacuum, playing (c) or (f) is a 0.1-stone mistake because of the allow-cuts, and everything else — including tenuki — is pretty close to optimal.
- Caution: It's easy to draw incorrect conclusions from this if you're not careful. Keep in mind this is the strength of a stone relative to S without any nearby stones, not even the edges/corners (which can be thought of as virtual stones). This never happens on small boards, and must be balanced with many other factors on larger boards.
- Given a stone S of the opponent's color in a vacuum, where should you play relative to it? Suppose it's Red to move again.
-
- Playing adjacent to S or a bridge away from S is a very slight inaccuracy because your opponent can respond adjacent or a bridge away (respectively) from both stones, as we'll cover soon. Moves further away from S, like those marked (*), are locally strong for Red. KataHex says the adjacent reply at (a) is a 0.05-stone mistake and the bridge reply at (b) is a 0.1-stone mistake. Other moves, including tenuki, are close to optimal.
-
- Let's move on to some important two-stone patterns. Consider a stone of your color and an adjacent opposing stone, like in the diagram below. Suppose it's Red's turn. Locally, how far from optimal is each marked Red response (a)–(g) (where some responses have the same letter due to symmetry)? How far from optimal is it to tenuki?
-
- Red is already "ahead" by 0.05 stones because Blue played adjacent to Red (which was a 0.05-stone mistake). This is our baseline for evaluating Red's move.
- Red's optimal local response is (a), preserving the 0.05-stone advantage. This is a very important local pattern! (It's also our first nonlinearity. While playing adjacent to your own stone in a vacuum is a mistake since you're overplaying that region — the second stone is partially redundant with the first — the presence of the opposing stone makes that no longer true. As we'll see later, an important topic is learning how opposing stones influence your own.)
- Pop quiz: how much worse than (a) is each of the other marked moves (including tenuki), in fractions of a stone, assuming no other major nonlinearities? This is a tricky exercise, but if you understand the mental model well and know about cuts, you already know enough to make reasonable predictions. Analyzing real games often involves similar kinds of guessing.
- Answers:
- Tenuki: The simplest response to analyze. If Red tenukis instead of playing (a), then by symmetry Blue could play (a) herself! That flips a 0.05-stone advantage into a 0.05-stone disadvantage, implying that tenuki is a 0.1-stone mistake. Indeed, KataHex agrees when you check the evals. In a way, the strength of (a) is why Blue's earlier choice to play adjacent to the Red stone is locally slightly inaccurate. And because tenuki is suboptimal, the local pattern is slightly tactical; this contributes to Hex games feeling like lots of local fights rather than a "cold" game.
- (b): This is an adjacent allow-cut. We haven't quantified these precisely, but you should expect (b) to be a blunder. KataHex says it's a 0.4-stone mistake, and Blue's best reply is cutting through at the adjacent (a).
- (c): This is a mistake because Blue can respond at the non-adjacent (a), rendering (-) below relatively useless. KataHex quantifies (c) as a 0.35-stone mistake.
- (d): Blue can respond at either (a) and create a pattern congruent to the one where Red plays (c), so this is at least a 0.35-stone mistake. KataHex says Blue can do even better responding with tenuki or (e), so it thinks (d) is actually a 0.4-stone mistake.
- (e): The start of a bottleneck, but more importantly, it's a near allow-cut. Applying our mental model: a near allow-cut is a 0.1-stone mistake, but given that Red didn't play (a), we should think of this on top of a tenuki baseline, which adds another 0.1 (total 0.2). KataHex says it's a 0.2-stone mistake.
- (f): This is a retroactive near allow-cut. Blue can play at (a) or (b) to reach a position congruent to the one where Red plays (e), so it's at least a 0.2-stone mistake. Blue tenuki may be slightly stronger; KataHex says (f) is a 0.25-stone mistake because of that.
- (g): This and similar Red moves further away from the blue stone are harder to reason about. KataHex thinks these moves are generally 0.15- to 0.2-stone mistakes; working backwards, you could decompose that into a 0.1 tenuki baseline, and attribute the remaining portion to the "non-tactical" component of the move's strength. Also, it should be intuitive that the further away the Red move, the more it "looks like" tenuki, where the non-tactical component tends to zero in the limit. (Again: while this is handwavy, the general approach of "fuzzy reasoning" we used here — taking the heuristics you know to imply conclusions that aren't necessarily "correct" in some theoretical sense, but that are much better than blind guessing — is a powerful tool when thinking about real games.)
- Deviations between KataHex and our mental model are unsurprising and don't invalidate the mental model — our reasoning was a bit handwavy, Blue often has stronger alternatives, KataHex evals are inherently noisy, and we probably didn't account for all nonlinearities.
- If you understand the above, you only have to memorize that (a) is the optimal reply, because you can reconstruct nearly all of the rest from first principles and fuzzy reasoning.
- Let's consider the other important two-stone pattern, a stone of your color and an opposing stone a bridge away. Suppose it's Red's turn. We can do a similar exercise and evaluate (a)–(g) and tenuki.
-
- Red is already ahead by 0.1 stones because Blue played a bridge away from Red.
- Red's optimal local response is (a), preserving the 0.1-stone advantage. This is an important pattern, and we will say much more about it later. [Reminder to self: Talk about this pattern but extended, the bridge intrusion, the retroactive bridge allow-cut and its role in pruning relative to the bridge intrusion.]
- Quiz: how much worse than (a) is each of the other marked moves (including tenuki)?
- Answers:
- Tenuki: By symmetry, if Red tenukis, Blue can play at (a), turning a 0.1-stone advantage into a 0.1-stone disadvantage, so tenuki is a 0.2-stone mistake. KataHex agrees, and just like in the adjacent case, this pattern is tactical.
- (b): This is a near allow-cut, and after Blue responds at the adjacent (c), the resulting pattern is congruent to case (e) in the previous discussion of the adjacent 2-stone pattern (where KataHex said it was a 0.2-stone mistake). However, unlike the previous case, our baseline is higher: Red is ahead by 0.1 with the optimal response, not 0.05. It's worse (by 0.05) to start from a 0.05-stone higher baseline and reach the same result, so this is actually a 0.25-stone mistake.
- (c): This is congruent to case (c) in the adjacent 2-stone pattern (which was a 0.35-stone mistake), but we're starting from a 0.05 higher baseline, so this is a 0.4-stone mistake.
- (d) and (e): Most simply, these Red replies are weak because they're adjacent to Red's existing stone, and Blue's existing stone isn't sufficiently close enough to make the second red stone useful. KataHex says this is a 0.4-stone mistake.
- (f): This is a long bridge allow-cut. According to our mental model, this should be a 0.3-stone mistake — 0.2 from the tenuki baseline, and 0.1 from the allow-cut. KataHex nearly agrees and says it's a 0.35-stone mistake.
- (g): This is a (short) bridge allow-cut. KataHex says it's roughly a 0.5-stone blunder.
That was a pretty dense section, so let's take a breather and summarize.
- The main lesson is learning how to think when playing Hex — how to convert your knowledge into a useful assessment of a position. In real games, you won't be doing arithmetic, but you will have to weigh various tradeoffs intuitively.
- Here's an example of what that might actually look like during a game. In this position, Blue is considering whether to play 6. h4, which is a bridge allow-cut that allows Red to play 7. j3. One good way for Blue to think about it: "Should I bridge allow-cut here? Normally no, bridge allow-cuts are terrible, but in this case, their cutting move j3 would be on their third row, which is really bad for them. But I know that's not necessarily enough to make the allow-cut convincing, and it would still be too risky. But wait, in this case, they already played c2, making j3 even more redundant and overplaying the top edge. And h4 is locally strong too, at least considering the two-stone pattern of moves 4 and 5. Okay, all things considered, there's probably enough evidence to believe that h4 is a decent move here." Of course, you could apply similar reasoning when thinking about your opponent's potential replies (or further down the game tree).
- The main takeaways from the simple patterns:
- Think twice before playing adjacent to your own stone, unless both stones are adjacent to the same opponent stone. People frequently break this rule (by playing adjacent to their own stone without opposing stones) while trying to "minimax"; while this is occasionally strong (and you can learn the cases where it's good), it's usually a blunder. Generally, only analyze these moves after you've considered other options.
- On the other hand, playing a bridge away from your own stone is frequently strong — such moves should generally be on your radar.
- If you play adjacent or a bridge away from an opponent stone, you should expect an increased chance that the next few moves are all in the vicinity. That helps with pruning and deciding which lines to analyze more deeply.
- [part 2: talk about more complex patterns and other heuristics?]
In these patterns, the shaded cells are expected to be empty.
- Pattern 1 is strong for Red (and weak for Blue), because Red threatens to play at (*) to kill the blue stone at (-). Even if Red hasn't played (*), the pattern is still weak for Blue, because the effectiveness of (-) is hindered by the other blue stone.
- This pattern frequently happens near the obtuse corner, as a result of bad minimaxing. In the first example below, Blue 3 is a common, but misguided, attempt at minimaxing. However, it's a mistake, and Red 4 (which creates the pattern) is the best reply. This position is weak for Blue even though Red does not plan to play (*) (as it is too close to his own edge) — Blue 3 hinders Blue 1, and the damage has already been done. In the second example, Blue 5 is a bad minimaxing move that creates the pattern, and Red 6 kills the blue stone.
- [part 3: talk about the edges, simple edge patterns, and how opposing stones influence the strength of your stones, both proactively and retroactively?]
bullet hex strategy?
I have not thought about this much, but you can model bullet Hex (i.e., Hex with very fast time controls) as Hex where some fraction of your moves must be premoves. Practically speaking, what does this mean? You should occasionally play premove tricks (moves that give you a large advantage assuming your opponent premoves the "expected" move or otherwise doesn't react to your move), and you should play in a way that's resilient to premove tricks, even if the moves are suboptimal in regular Hex. The frequency of premove tricks should increase significantly as players get into time pressure.
It would be interesting to study "bullet Hex strategy". Here's a starting example. Suppose you're Red and pushing the ladder below, but it's Blue's turn. Both players are under time pressure, and you have a split second to play a premove (or hover your mouse) if you wish. You expect Blue to continue pushing the ladder by playing at P. Where do you play?
I think it depends:
- Case 1: The rest of the board is settled, Red has a forced win (for example, a ladder escape), and he simply needs to carry out that win without running out of time.
- Naively, Red just keeps pushing the ladder by premoving or hovering over (*). However, the risk here is that Blue can play a premove trick—she can yield by playing at Y instead of the expected P, and if Red premoves the push at (*) (or doesn't premove, but fails to react that Blue played an unexpected move and plays (*) nonetheless), then Blue plays at Z.
- A better idea for Red is to premove at P. Then, if Blue plays "as expected" by pushing the ladder at P (instead of yielding), the premove doesn't go through and Red plays at (*). However, if Blue does yield at Y, Red's premove goes through and is a good move.
- Case 2: There is play remaining elsewhere, so Red could conceivably let Blue connect in exchange for territory. Or, Red has a forced win but is behind on time, and the ladder is really long and he'll lose on time if he simply tries the strategy from Case 1.
- Most of the time, Red can still play the "premove P, click (*)" strategy from Case 1. However, with a small probability, Red waits for Blue to play at P, then he plays at (+) instead, hoping Blue will premove her next move. This is a premove trick, and unlike the strategy from Case 1, it's important that Red doesn't play it 100% of the time—he needs to play it as part of a mixed strategy. If Blue notices, the downside is that the ladder has just been pushed up one row. But if Blue premoves and pushes the ladder again at Q, then Red plays at (-) and immediately wins.
- Blue might not like the fact that Red has this premove trick. One possible resource for her is to "premove (*), click Q" while defending the ladder; this probably works quite well in bullet.
katahex/general strategy (draft material)
Miscellaneous topics
- Acute corner joseki continuations. Red 7 is an inaccuracy but this is a common joseki: https://hexworld.org/board/#19nc1,e6e4d4e3d3d5c7f2b7c5b10i2. Study the "continuation" moves Red 11 and Blue 12, and study similar moves in related joseki.
- For example, gain intuition for why Red 13 is the best move in https://hexworld.org/board/#19nc1,d5d4c5c3b4b3e4f2c4d3g3:pb8 (a5/b5 are captured by Red; see Theorems_about_templates#The_shape_of_templates), why Red 17 is the best move in https://hexworld.org/board/#19nc1,e6e5d6d4c5c4f5g3d5e4h4i2b5b4j3:pc9, and why other moves are weak.
a3 opening
Nowadays, strong players rarely play a3 on the first move because it's similar to c2 (which is already on the losing side on most board sizes), but a bit weaker. There are some subtle differences between a3 and c2, however, and most strategy advice on the a3 opening is outdated.
If Red plays a3, some older strategy guides recommend that Blue respond d6 or e7 if she wants to play in the acute corner. However, KataHex considers this an inaccuracy; even though d6 and e7 are attacking stones in the sense that Blue would win a bridge ladder towards the acute corner, they don't do a good job blocking Red's edge the way e4 does in an empty corner.
If you want to play in the acute corner, 5-5 or 4-4 is a good choice on smaller boards. (There are other options further away from the corner on larger boards.) KataHex and other bots consistently prefer these moves:
- https://www.littlegolem.net/jsp/game/game.jsp?gid=2175191&nmove=4
- https://www.littlegolem.net/jsp/game/game.jsp?gid=2033243&nmove=2
- https://www.littlegolem.net/jsp/game/game.jsp?gid=2018841&nmove=8
- https://www.littlegolem.net/jsp/game/game.jsp?gid=1950209&nmove=20
One reason may be the efficiency of templates IV2e and V2d, both of which have a "hole"; the template can be rotated so that the hole coincides with Red's a3 stone. This is explored in more detail below.
It can be useful to realize that a3 is primarily a blocking move (blocking Blue on the left rather than helping Red connect to top), whereas c2 is half blocking and half connecting. To illustrate the point, it's a bad idea for Red to play both c2 and 4-4 obtuse corner on the top edge (in the absence of Blue's blocking stones), because that's too much strength near the top. However, Red could feasibly play both a3 and 4-4 on the top edge.
a3 can combine well with c5. Red's goal is to leave b4/c5 open as options (these are the same hexes used in the a3 escape trick, but of course, a3+c5 can also connect upwards). Blue should also keep an eye on b4 - not to play immediately because it's too close to her own edge - but as the most efficient option for connecting to the left side near the top. Blue would much prefer to connect using b4 (which is a locally efficient move that neutralizes a3's switchback and upwards connecting potential) than b5 (which only slightly weakens a3's potential, forcing Red to play d5 instead of c5), or a 2nd row ladder with b3 (which removes Red's weakness at b1).
a3 is one of my favorite openings to analyze (I only wish it were more fair as an opening move). Unlike c2 where Blue's best move is typically to tenuki, a3 gives Blue the option to fight in the same acute corner. There is essentially a separate theory of a3 corner joseki.
I find a3 lines particularly educational because a3 changes the corner just enough to make different moves more efficient. You can learn a lot about how an existing stone influences neighboring stones.
- d4: https://hexworld.org/board/#14c1,a3d4e4e3
- Note that Red e4 is near his own edge, but it's adjacent to Blue's stone at d4 and does a good job at blocking it; this is analogous to the joseki https://hexworld.org/board/#14nc1,k10k9, where Blue 2 is often a strong move. Blue e3 is counterintuitive, but it forms template V2d, which has a hole at Red's a3. In essence, Blue makes Red's a3 stone nearly useless in this line.
- Red avoids b5 which is a very weak move, because it makes Blue b4 even more efficient: https://hexworld.org/board/#14c1,a3d4b5b4c4d2. This position is practically Blue's dream; Blue makes full use of d4 and the weakness at a3 with template IV2e (which also has a hole).
- This is similar to Red 5 being a blunder in this opening: https://hexworld.org/board/#14nc1,a10d11c12c11b12b11
- e3 first: https://hexworld.org/board/#14c1,a3e3c4b4d2c3d3c5
- d3 is bad: https://hexworld.org/board/#14c1,a3d3b4
- Why is e4 weak? After Red c5!, the normally locally efficient b4 (even though it's globally inefficient, because it's on Blue's 2nd row) is terrible because Red d3 is a bridge cut. Note that a3 primarily is a blocking move, not a connecting one, so d3+a3 is not so much strength near the top that it renders d3 a bad move. https://hexworld.org/board/#14c1,a3e4c5b4d3
- e5: In some ways, these resemble the low intrusion 5-4 joseki, shifted up one row.
- https://hexworld.org/board/#14nc1,a3e5c5c6d6d5 Red 5 is optional but actually an acceptable bridge peep, because intruding on the other side of the bridge would be too much strength near the top and almost never a good idea.
- Red must still avoid b5 for the same reason as before: https://hexworld.org/board/#14nc1,a3e5c5c4b5b4d4f3d3 is very favorable to Blue. Observe that Blue 8 at f3 is more efficient than at e2, because e2 is followed by Red f3 which is a bridge cut.
- https://hexworld.org/board/#14nc1,a3e5c5c4d4c6d6e6d5d7b8c7a7b6a6b5a5a4b4c2c3f3d2 Red peeps the bridge with 7. d6; Blue 8. e6 may be a stronger reply than connecting directly. While this variation represents strong play by both sides, and Red is doing just fine, Blue 20 and the sequence leading up to it is a good illustration of how Blue can play efficiently around Red's a3 stone.
- https://hexworld.org/board/#14nc1,a3e5c5d4c4c6f5h3 There are too many variations after Blue d4 to list them all. Blue 6 at d3 leads to a fun minimaxing sequence but is perhaps a slight inaccuracy: https://hexworld.org/board/#14nc1,a3e5c5d4c4d3b6d2c3d7
Notation for distances
When analyzing patterns, it's useful to have a way to express various distances concisely. There are terms like adjacent, bridge, "classic block," but larger distances are hard to describe. Distances like "two hexes away" are ambiguous: does it mean a distance of 2 (like a1 and c1) or two hexes in between (like a1 and d1)? Everyone has their own way of thinking about it. Here's the one I use:
- Pretend that the hex grid consists of regular hexagons, and adjacent hexagons' centers have distance 1. (Equivalently, the centers of the hexes form a triangular lattice; pretend these triangles are equilateral with side length 1.)
- It's not hard to show that a "bridge" (like a1 and b2) has length sqrt(3) if you connect the centers, and a "classic block" (like a1 and c2) has length sqrt(7). A fun exercise is to show that the distance between the centers of two hexes is always the square root of an integer. Which integers are possible as squared distances? Answer: Löschian numbers.
- The fact that squared distances are integers is notationally convenient. Let Δn denote a squared distance of n (I like this because it looks nicer than a square root symbol, and a letter like "d" can be confused with a coordinate).
- "Adjacent" is Δ1; "bridge" is Δ3; "classic block" is Δ7; the distance between a1 and c1 is Δ4; "two bridges away" is Δ12.
- Are there collisions? Yes, but the first collision is Δ49 (a distance of 7), which is both the distance between a1 and h1, and between a1 and f4. This is large enough that for practical purposes, the notation is unique. (An interesting fact: the first number with a 4-way collision is, coincidentally, 1729 of Ramanujan fame.)
- Here is a mapping of squared distances from the hex marked (*). Most of the time, you only need distances up to Δ16.
Why I like the swap rule
- The standard reason: It makes the game much more fair.
- Every Hex player knows "Hex without swap is a first-player win." Add the swap rule, and you get another elegant result for free: "Hex with swap is a second-player win."
- It provides much-needed asymmetry to the opening. The Hex board has two-fold rotational symmetry, and on odd-sized boards without swap, most players will open in the center. The symmetry isn't broken until the second turn!
- The opening stone is especially influential in determining the character of the game. On 19x19, games that open with c2 look quite different from those that open with a10. A lot of cool tactics, like the a3 and a4 switchbacks, only really appear when you add the swap rule. The swap rule greatly expands the variety of plausible positions, and who doesn't like more variety?
- While the second player has a theoretical advantage, the first player has a practical advantage: she can choose what opening to play. Because the opening stone is much more influential than later stones, the first player can pick an opening that she's especially familiar with, or one that her opponent is weak at. It would not be surprising if the first and second player's advantages cancel out among strong humans (on 19x19), and each player wins almost exactly 50% of games.
- Since the swap rule is nonconstructive, it scales up beautifully to larger boards. Even if players have no idea which opening stones are fair, it's virtually certain that fair stones exist, and there should be no qualms about fairness. Contrast this with komi in Go: a fair komi has to be empirically determined for each board size, and there could be disagreements about the komi for various board sizes. (This concern is alleviated with auction komi, but that adds another rule to the game.)
- It's resistant to partial solutions. Let's say that someone miraculously comes up with a constructive proof that the obtuse corner is winning on 19x19. No problem, players will just stop playing obtuse corner and play other opening moves instead.
- It's fun to try to trick players into swapping a weak move or not swapping a deceptively strong move. :)
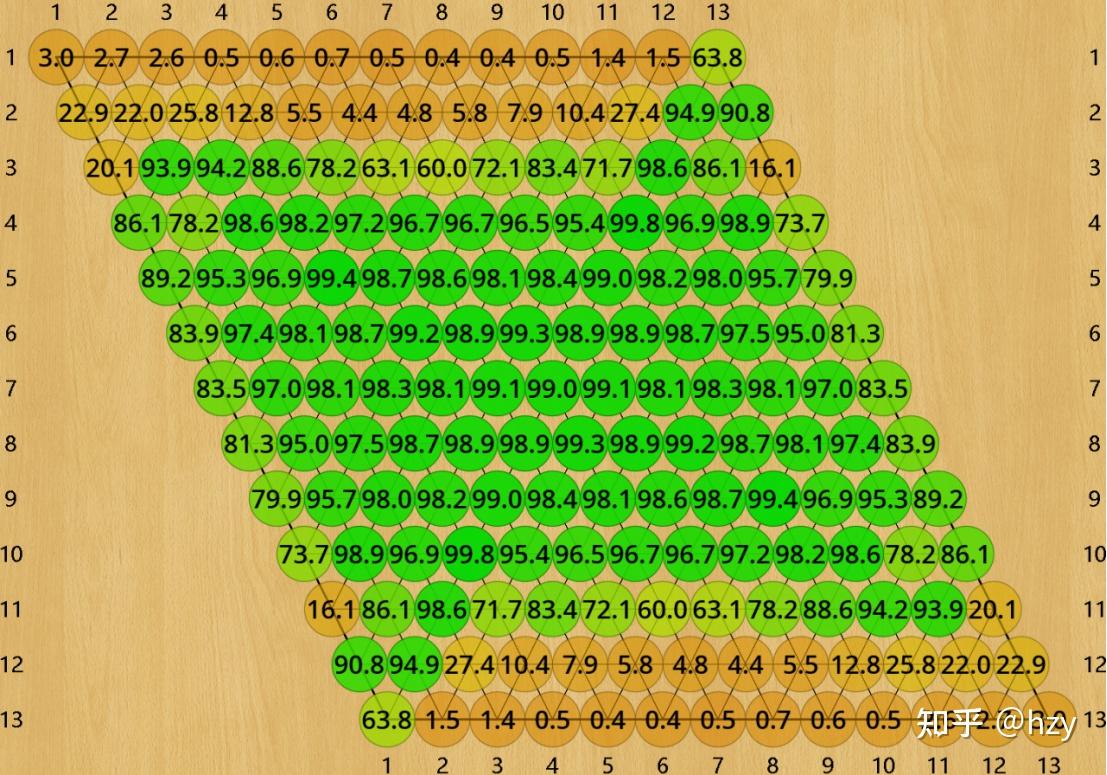
Insights and tidbits from KataHex
- Swap map for 19×19 generated with KataHex net 20240812 using Hexata, with around 30k–40k visits for most moves. For the red hexes, the number corresponds to Blue's Elo advantage if she swaps Red's move; for the blue hexes, the number corresponds to Blue's Elo advantage if she does not swap Red's move. Smaller numbers correspond to fairer openings. Includes all fair openings as well as a few selected unfair openings, including the strongest move without swap (e10).
Random unsolved questions
Most of these are very difficult to answer, and I would be happy if even a few were answered in the next few years:
- Is the obtuse corner always winning on larger board sizes? What about the b4 opening? Let P(n) be the statement that "the obtuse corner is a winning opening in n×n Hex without swap." There are a few possible cases; an interesting exercise is to come up with subjective probabilities of each case being true.
- A. P(n) is always true. If so, can we prove this?
- B. P(n) is true for infinitely many n, with finitely many counterexamples. If so, what's the smallest counterexample?
- C. P(n) is true for infinitely many n, with infinitely many counterexamples. If so, does P(n) hold "almost always," "almost never," or somewhere in between?
- D. P(n) is true for finitely many n. If so, what's the largest such n?
- Kriegspiel Hex (Dark Hex), a variant with incomplete information
- Under optimal mixed strategies, what is Red's win probability on 4×4?
- For larger boards (say, 19×19), is Red's win probability close to 50%?
- If so, a swap rule might not be needed for Kriegspiel Hex, which would be neat.
- If not, imagine a variant where Red's first move is publicly announced to both players, and Blue has the option to swap it. Which initial moves are the fairest now?
replies by Demer:
- https://zhuanlan.zhihu.com/p/476464087 has percentages, although it doesn't translate these into a guessed swap map and I don't know anything about the bot they came from.
- It suggests that [on 13x13, g3 is the most balanced opening] and [on 14x14, g3 should not be swapped].
- On 27x27 without swap, it likes the 4-4 obtuse corner opening slightly more than anything else nearby.
- As far as I'm aware, even 3×4 Dark Hex has not been solved. (https://content.iospress.com/articles/icga-journal/icg180057 apparently gives "some preliminary results" for that size.)
hexanna:
- Thank you, this is amazing! From the Google Translate, the bot is an adaptation of KataGo trained on 13×13 and smaller, using transfer learning to train larger nets on top of the 13×13 net for a short period of time. I may edit the swap rule article later with some insights.
- The results for up to 15×15 look very reliable to me. This is because many of the subtle patterns suggested by other bots, like leela_bot, appear in these swap maps. For example, on 13×13:
- a1–c1 are stronger than d1; a2–c2 ≥ d2 ≥ e2 in strength; and a similar relation holds for moves on the third row. See Openings on 11 x 11#d2.
- b4 is weaker than all of its neighbors, because Blue can fit the ziggurat in the corner.
- j3 is surprisingly weak and i3 is surprisingly strong. Many people were surprised about this when leela_bot's swap map came out, but the result may be more than just random noise.
- a10 is the weakest of a4–a10, while a5 is the strongest.
- b10 is stronger than all of its neighbors, because Blue cannot fit the ziggurat in the obtuse corner.
- That this bot picked up on all these subtleties, and assigns a win percentage close to 100% for most moves on 13×13, suggests to me that it is probably stronger than leela_bot and gzero_bot. I can't know for sure, though.
- On the other hand, the author seems to agree that the 37×37 map looks very unreliable. I see percentages as low as 37% but only as high as 54% (for a move like f1, which should almost certainly be a losing move).
- The 27×27 map looks more reliable. I'm personally very skeptical that moves on Red's 6th row are among the most balanced moves, but there are some interesting (if somewhat noisy) insights to be had still.
- The results for up to 15×15 look very reliable to me. This is because many of the subtle patterns suggested by other bots, like leela_bot, appear in these swap maps. For example, on 13×13:
Recursive swap
Not really a serious suggestion, just for fun. One advantage of "recursive swap" over multi-stone swap is that opening preparation plays a smaller role, because both players have control over the first n stones.
RECURSIVE_SWAP'[k, depth, color]:
  if depth = 0:
    [color] continues playing as normal.
  else:
    [color] plays a move. [~color] can either
      swap[k], or
      RECURSIVE_SWAP'[k+1, depth-1, ~color]

RECURSIVE_SWAP[n]:
  RECURSIVE_SWAP'[1, n, Red]
RECURSIVE_SWAP[0]:
Red continues playing as normal.
RECURSIVE_SWAP[1]:
Red plays a move. Blue can either
- swap, or
- continue playing as normal.
RECURSIVE_SWAP[2]:
Red plays a move. Blue can either
- swap, or
- play a move, after which Red can either
- swap2, or
- continue playing as normal.
RECURSIVE_SWAP[3]:
Red plays a move. Blue can either
- swap, or
- play a move, after which Red can either
- swap2, or
- play a move, after which Blue can either
- swap3, or
- continue playing as normal.
Analysis
RECURSIVE_SWAP[0] is the same as playing with no swap.
RECURSIVE_SWAP[1] is the same as playing with the swap rule.
RECURSIVE_SWAP[2]:
- Red shouldn't play a move that's too strong or it'll be swapped.
- If Red plays a weak stone, Blue should try to play a move just strong enough that Red will be indifferent to swap2. (If a "fair" move is half a stone, and Red plays a weak move worth x < 0.5 stones, Blue should play a move worth x + 0.5 stones.)
- Red should try to play a weak move that's also hard for Blue to equalize (so that Red gets a sizable advantage when deciding whether to swap2 or not).
RECURSIVE_SWAP[3]:
- If Red plays a move worth x > 0.5 stones, Blue should swap.
- If Red plays a weak stone worth x < 0.5, Blue should play a move worth less than x + 0.5 (or else Red will swap2). If Blue's move is worth y, then Red should play a move as close to (y - x) + 0.5 as possible, so that Blue's swap3 decision is difficult.
- Red should play a weak move that's hard for Blue to find a tricky reply to (where a "tricky" reply is one that makes it hard for Red to equalize, such that Blue has an easy time deciding whether to swap3 or not).