Difference between revisions of "Bottleneck"
From HexWiki
m (cat. strategy) |
(added two more bottlenecks) |
||
| Line 6: | Line 6: | ||
The bottleneck formation invariably leads to a [[Ladder|ladder]] situation. | The bottleneck formation invariably leads to a [[Ladder|ladder]] situation. | ||
| + | |||
| + | == Bottlenecks with bridges == | ||
| + | |||
| + | <hex>R4, C4, | ||
| + | Hb1 Vc1 Hd1 | ||
| + | |||
| + | |||
| + | Hb4</hex> | ||
| + | |||
| + | <hex>R4, C6, | ||
| + | Vd1 | ||
| + | Hb2 He2 | ||
| + | |||
| + | Hb4</hex> | ||
[[category:strategy]] | [[category:strategy]] | ||
Revision as of 00:07, 30 January 2008
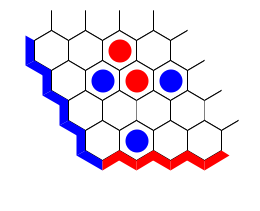
The bottleneck is a common defense pattern. The board fragment below shows a position where the vertical player (red) wants to connect to the bottom, but is being hindered by blue in a bottleneck formation.
The bottleneck formation invariably leads to a ladder situation.
